Nice overview of current game engines from freecodecamp.
Overview of Game Engines in 2021
Reply

Nice overview of current game engines from freecodecamp.
Building video games can be just as much fun as playing them. And this in-depth Unity 3D course for beginners will show you how to get started as a game developer. You’ll learn how to install Unity, program game physics, animate your characters, code your enemy AI, and more. (7 hour YouTube course): https://www.freecodecamp.org/news/game-development-for-beginners-unity-course/
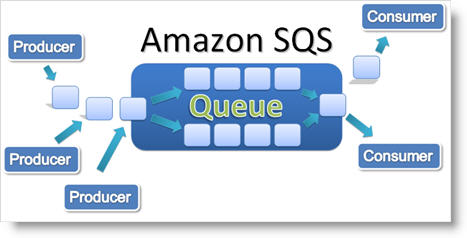
A project I’m working on right now uses Amazon’s SQS service to handle interprocess communication between elements of a large and complex back end architecture. SQS is a fully managed message queuing service that enables you to decouple and scale microservices, distributed systems, and serverless applications. Using SQS, you can send, store, and receive messages between software components at any volume, without losing messages or requiring other services to be available.
One of our uses cases requires a SQS message to be triggered and created by an external call to our API. The most common way of handling this is to use a Lambda function to respond to an API request and then the Lambda function will create the appropriate SQS message and add it to the queue. What if we could skip Lambda all together? Amazon API Gateway can now be used to directly created SQS messages.
High level steps I followed
<>
Details on #3 (Published an API on API Gateway)
URL Query String Parameters:
Action ‘SendMessage’
MessageBody method.request.querystring.MessageBody
MessageBody=TestMessageHello
Used API Gateway Test function to call /v1/send/GET with MessageBody and then confirmed it appeared correctly in the previously created queue
Response is
{
“SendMessageResponse”: {
“ResponseMetadata”: {
“RequestId”: “dfc617e1-b3c9-56a8-b9bf-426457676e2d”
},
“SendMessageResult”: {
“MD5OfMessageAttributes”: null,
“MD5OfMessageBody”: “0ef0d7773a388095bee26966144cc131”,
“MessageId”: “3eb7ed29-c259-4b15-8bd3-bedeac865ee5”,
“SequenceNumber”: null
}
}
}
Logs
Execution log for request 01e665e2-9394-11e9-80e3-7b3c608a2b3c
Thu Jun 20 19:45:50 UTC 2019 : Starting execution for request: 01e665e2-9394-11e9-80e3-7b3c608a2b3c
Thu Jun 20 19:45:50 UTC 2019 : HTTP Method: GET, Resource Path: /v1/send
Thu Jun 20 19:45:50 UTC 2019 : Method request path: {}
Thu Jun 20 19:45:50 UTC 2019 : Method request query string: {MessageBody=TestMessageHello}
Thu Jun 20 19:45:50 UTC 2019 : Method request headers: {}
Thu Jun 20 19:45:50 UTC 2019 : Method request body before transformations:
Thu Jun 20 19:45:50 UTC 2019 : Endpoint request URI: https://sqs.us-west-2.amazonaws.com/453862545997/ninegeartest?Action=SendMessage&MessageBody=TestMessageHello
Thu Jun 20 19:45:50 UTC 2019 : Endpoint request headers: {Authorization=*************************************************************************************************************************************************************************************************************************************************01fa36, X-Amz-Date=20190620T194550Z, x-amzn-apigateway-api-id=mf9zjl6bxj, Accept=application/json, User-Agent=AmazonAPIGateway_mf9zjl6bxj, X-Amz-Security-Token=AgoGb3JpZ2luEK///////////wEaCXVzLXdlc3QtMiKAAkhESmjWUuH4MmwXcX3mJZu1ZFF29by1qO8Y/mUjx1llmQ6VlpkceQ2wnYfz8Gr4loy/CxqjjQeKa4Zpz83c1c5aEV7LrX4XlBIFxH5c+0O/BHA4Y6JbcSCSzc2z/Y6AUpvBnrfdE+S7TAqQw0aXzDTVfoFiysOFhatFmGfDa3TmXbNje6yqsj2QJKcTpI2D8KlN1IqUcuIMyYW06j8iZlcDcDuaB9BNtw3cNimdZpvUknaOr6HZ9kaSmhhIGnyRYxTN7bEnsqEGQY00p1Xsr8Q8JTrAaiHYSZA+964bBPWbladcrBPPvYGw111yV8teyabwJ6BczFmPHONyKNBSEbwqigMIlf//////////ARAAGgw0NTM4NjI1NDU5OTciDJAFb/8TLGKSTv3VkireAptIn3MrBh0o+01/ckMLSEM8kpHeFlnXhWeqfbQ11PIEH36/I7ahYyZE0Z7eS8fGbZ4DQmXDjB5D2Z6Y8Wo8b1gfnxZ7MwGdYhDlo/x4KeE7R92XbhPX+tAEsL61TMx6Pls7c9 [TRUNCATED]
Thu Jun 20 19:45:50 UTC 2019 : Endpoint request body after transformations:
Thu Jun 20 19:45:50 UTC 2019 : Sending request to https://sqs.us-west-2.amazonaws.com/453862545997/ninegeartest?Action=SendMessage&MessageBody=TestMessageHello
Thu Jun 20 19:45:50 UTC 2019 : Received response. Status: 200, Integration latency: 18 ms
Thu Jun 20 19:45:50 UTC 2019 : Endpoint response headers: {x-amzn-RequestId=dfc617e1-b3c9-56a8-b9bf-426457676e2d, Date=Thu, 20 Jun 2019 19:45:50 GMT, Content-Type=application/json, Content-Length=276}
Thu Jun 20 19:45:50 UTC 2019 : Endpoint response body before transformations: {“SendMessageResponse”:{“ResponseMetadata”:{“RequestId”:”dfc617e1-b3c9-56a8-b9bf-426457676e2d”},”SendMessageResult”:{“MD5OfMessageAttributes”:null,”MD5OfMessageBody”:”0ef0d7773a388095bee26966144cc131″,”MessageId”:”3eb7ed29-c259-4b15-8bd3-bedeac865ee5″,”SequenceNumber”:null}}}
Thu Jun 20 19:45:50 UTC 2019 : Method response body after transformations: {“SendMessageResponse”:{“ResponseMetadata”:{“RequestId”:”dfc617e1-b3c9-56a8-b9bf-426457676e2d”},”SendMessageResult”:{“MD5OfMessageAttributes”:null,”MD5OfMessageBody”:”0ef0d7773a388095bee26966144cc131″,”MessageId”:”3eb7ed29-c259-4b15-8bd3-bedeac865ee5″,”SequenceNumber”:null}}}
Thu Jun 20 19:45:50 UTC 2019 : Method response headers: {X-Amzn-Trace-Id=Root=1-5d0be26e-b7b766dba15eb99009933350, Content-Type=application/json}
Thu Jun 20 19:45:50 UTC 2019 : Successfully completed execution
Thu Jun 20 19:45:50 UTC 2019 : Method completed with status: 200
<>
More details and an example I followed at https://dzone.com/articles/creating-aws-service-proxy-for-amazon-sqs

There has been controversy around Unity’s changes to their eula and how it affects independent developers. Improbable – a vc backed developer of a massive online multiplayer game back end solution – lost their Unity license for a short time, which in turn affected hundreds, maybe thousands, of independent game developers, or at least caused a lot of anguish and confusion.
With a closed source game engine you always face the chance of the rules being changed on you after you have invested years of development.
Is there a legitimate open source alternative to Unity or Unreal? Here are some candidates – I’ll be experimenting/evaluating several over the next month or so and will post feedback.
Godot provides a huge set of common tools, so you can just focus on making your game without reinventing the wheel.
Godot is completely free and open-source under the very permissive MIT license. No strings attached, no royalties, nothing. Your game is yours, down to the last line of engine code.
A free lightweight, cross-platform 2D and 3D game engine implemented in C++ and released under the MIT license. Greatly inspired by OGRE and Horde3D.
3D is a easy-to-use game creation platform. Architected from the ground up for maximum flexibility and performance across a wide range of hardware and built upon…

I’ve always done mobile development in the device native language (Objective-C/Swift for iOS, and Java for Android)
Recently I worked on a project that needed to be deployed on Android, iOS and eventually the web, using the same code base if possible. After reviewing the options I decided to use React Native.
React Native lets you build mobile apps using only JavaScript. It uses the same design as React, letting you compose a rich mobile UI from declarative components. It is the library used to build Facebook, Instagram, and many other applications.
The project was originally a native Android app – used by TED for handling attendees checking in to individual sessions during a conference. It makes multiple API calls to the server back-end, does NFC scanning, needs local data storage, and must work offline as well as online.
I’ll post more further down the road about working in React Native so for now I’ll list some initial pros and cons…
Pros
Performance – better and faster json parsing, cleaner program flow, screen redraw update appears faster than native if state is used properly
Multi-platform – same code base for Android and iOS, can also develop for web using React Native for Web.
Open source – strongy supported by facebook, code available on github, 1,700 contributors, 68,000 stars
Cons
Javascript – the language still makes me nervous, I like a strongly typed language – recommend using typescript or flow to lower your risk.
Debugging – debugging tools aren’t as mature as I would like, using Chrome and a lot of console.log calls – which is definitely old school.
Tools – no integrated tools, I use a mixture of the command line, Chrome, and Sublime Text as my editor.
<>
Further reading
How to Get Started with React Native
I get asked quite often for good sites to learn programming or web site development, here are a few resources I recommend.
freeCodeCamp – the best place to learn html, javscript and the rest of technologies necessary for front end web development, they are also working on a full stack developer course as well – can’t recommend these guys enough – a great intro to web technologies
Google has a list of resources and a guide intended for Computer Science students seeking an internship or university grad role at Google but it is useful for anyone who is interested in a software development career.
CS for All is an open book by professors at Harvey Mudd College which teaches the fundamentals of computer science using Python. It’s an accessible read and perfect for programming beginners.
If you’ve never programmed before check out the Getting Started page on Learn To Code with Me by Laurence Bradford. She’s done an incredible job of breaking down the steps beginners should take when they’re uncertain about where to begin.
This short 5 minute video explains why it’s better to think of projects you’d like to build and problems you want to solve with programming. Start working on those projects and problems rather than jumping into a specific language that’s recommended to you by a friend.
This post outlines the steps required to integrate Vuforia for Digital Eyeware with the MergeVR SDK in Unity. The result of this integration will be an Augmented Reality demo app that can be run in the MergeVR headset on your Android device. It will recognize an image marker and display a 3d object on top of that marker, and allow the user to trigger a virtual button on the object – then enter in VR mode and move around the VR scene using the MergeVR headset capactive input buttons.
https://developer.qualcomm.com/software/vuforia-augmented-reality-sdk
Requirements
Android mobile device
Unity3d – version 4.6.*
Vuforia – Download the core Vuforia unity package – vuforia-unity-5-0-5 (you must be a registered Vuforia developer before the download) and the eyeware samples vuforia-samples-eyewear-unity-5-0-5
MergeVR – download latest Merge SDK Unity package- MergeVR_version_v062
Steps
viewportYpos = viewportBottom;
with
viewportYpos = viewportBottom+(Screen.height-viewportHeight);
and in the ‘MergeCameraController.cs’ script in MergeVR->Scripts comment out the following lines in the function AndroidGyroTracking
/*
if (Input.deviceOrientation==DeviceOrientation.LandscapeRight || Input.deviceOrientation==DeviceOrientation.LandscapeLeft)
currentOrientation=Input.deviceOrientation; //only change on either full landscape
if (currentOrientation==DeviceOrientation.LandscapeRight) {
androidGyroRotation = new Quaternion (-Y, X, Z, -W);
androidGyroRotation *= Quaternion.Euler(180f,180f,0);
}
else
*/
leaving
androidGyroRotation = new Quaternion (-Y, X, Z, -W); //default
using UnityEngine;
using System.Collections;
public class MergeEyeCustom : MonoBehaviour {
public float speed = 1.5f;
public float jumpSpeed = 10.0f;
public float gravity = 10.0f;
public bool allowJump = false;
Vector3 moveDirection = Vector3.zero;
float ydirection = 0f;
float xdirection = 0f;
// Use this for initialization
void Start () {
}
// Update is called once per frame
void Update () {
if (Merge.MSDK.isControllerConnected ()) {
ydirection = Merge.MSDK.getController ().GetAxis (“Vertical”);
xdirection = Merge.MSDK.getController ().GetAxis (“Horizontal”);
} else {
//Use arrow keys in editor – or touch capactive buttons if present in MergeVR headset
if (Input.GetKey (KeyCode.UpArrow) || Merge.MergeInput.GetInput(1))
ydirection = -1;
else if (Input.GetKey (KeyCode.DownArrow) || (!allowJump && Merge.MergeInput.GetInput(0)))
ydirection = 1;
else
ydirection = 0;
if (Input.GetKey (KeyCode.RightArrow))
xdirection = 1;
else if (Input.GetKey (KeyCode.LeftArrow))
xdirection = -1;
else
xdirection = 0;
}
moveDirection = new Vector3 (transform.forward.x * ydirection*speed, 0f, transform.forward.z * ydirection*speed);
moveDirection += new Vector3 (transform.right.x * xdirection*speed, 0f, transform.right.z * xdirection*speed);
transform.position+=moveDirection* Time.deltaTime;
}
}
remove or modify one of the gaze cursors
optimize rendering performance
add a rigid body or first person controller for more realistic collisions the VR scene

If you are using Parse for your back-end server in a Unity app, and you want to deploy the app to Android, you may run into some issues with the built-in Parse plugin. Specifically (at least in my case with Unity 4.6 and Android KitKat) the Parse query object doesn’t ever return a result.
As a work-around I ended up going with a solution using Unity’s WWW class and the Parse REST API.
private IEnumerator GetParseDataForAndroid () {

	//new WWW object
	WWWForm form = new WWWForm();


	//set headers, not sure why but I had to set twice to get it to work
	Hashtable headers = form.headers.AddAuthorizationHeader("Your-Parse-Application-Id", "javascript-key=Your-Parse-REST-API-Key");

	headers.Add("X-Parse-Application-Id","Your-Parse-Application-Id");
	headers.Add("X-Parse-REST-API-Keyd","Your-Parse-REST-API-Key");

	WWW parseRequest = new WWW("https://Your-Parse-Application-Id:javascript-key=Your-Parse-REST-API-Key@api.parse.com/1/classes/yourObject", null, headers);


		//yield until request is done
		yield return parseRequest;


		//request is done, process results
		Debug.Log (" MergeVRBridge parse query eror result is " + parseRequest.error);


		//using simplejson
		var V = JSON.Parse (parseRequest.text);

		JSONArray results = V ["results"].AsArray;

		for (int i=0; i<results.Count; i++) {

			JSONClass jObject = results[i].AsObject;

			//do something interesting with results
			string sTitle = jObject["title"];
			Debug.Log(" yourObject " + sTitle);


		}


}
If you are building native Android plugins for Unity with Android Studio here are a couple of items that I struggled with. Note that all examples are using Unity 4.6 and Android Studio.
1. Unity Android plugin folder needs a jar file to function – but Android Studio build process does not produce a class jar file.
It turns out that Android Studio actually does create a jar file during the build process and stores it in an intermediate location (on the Mac it is in ‘build/intermediates/bundles/release/’).
Based on suggestions from here I created two new tasks in my gradle file – cleanjar and makejar – after a build I run both and now have the required jar file in my ‘build/outputs/’ folder.
task clearJar(type: Delete) {
delete ‘build/outputs/MergeVRBridge.jar’
delete ‘build/outputs/AndroidManifest.xml’
}
task makeJar(type: Copy) {
from(‘build/intermediates/bundles/release/’)
into(‘build/outputs/’)
include(‘classes.jar’)
include(‘AndroidManifest.xml’)
rename (‘classes.jar’, ‘MergeVRBridge.jar’)
}
2. If your Android library file requires a context – you can pass it to your lib from Unity.
AndroidJNI.AttachCurrentThread();
androidClass = new AndroidJavaClass(“com.mergelabs.MergeVR.MergeVRBridge“);
using(AndroidJavaClass activityClass = new AndroidJavaClass(“com.unity3d.player.UnityPlayer“)) {
activityContext = activityClass.GetStatic<AndroidJavaObject(“currentActivity“);
}
androidClass.CallStatic(“setContext“, activityContext);
androidClass.CallStatic<int>(“mergeVRInit“);
and in your Android Java clase you’ll have the appropriate function
private static Context mContext;
static public void setContext(Context context) {
mContext = context;
}
3. You need bluetooth permissions set in your Android plugins manifest file.
If you just copy and paste the manifest file from your Android Studio build directory to the Unity Android plugin directory you will see compile and build errors. It appears in Unity 4.6 that if you place a manifest file in the Android plugin directory it overrides the Unity created manifest file for the entire app.
The best solution is to find the Unity generated manifest file, copy it to a temp directory and modify by adding any permissions you need (in my case bluetoth related), then add to the Android plugins folder – Unity will use this manifest file as the default and all will be well.
<?xml version=”1.0″ encoding=”utf-8″?>
<manifest xmlns:android=”http://schemas.android.com/apk/res/android” package=”com.merge.demo” android:versionName=”1.0″ android:versionCode=”1″ android:installLocation=”preferExternal”>
<uses-permission android:name=”android.permission.BLUETOOTH”/>
<uses-permission android:name=”android.permission.BLUETOOTH_ADMIN”/>
<uses-feature android:name=”android.hardware.bluetooth_le” android:required=”true”/>
<supports-screens android:smallScreens=”true” android:normalScreens=”true” android:largeScreens=”true” android:xlargeScreens=”true” android:anyDensity=”true” />
<application android:theme=”@android:style/Theme.NoTitleBar” android:icon=”@drawable/app_icon” android:label=”@string/app_name” android:debuggable=”false”>
<activity android:name=”com.unity3d.player.UnityPlayerNativeActivity” android:label=”@string/app_name” android:screenOrientation=”sensorLandscape” android:launchMode=”singleTask” android:configChanges=”mcc|mnc|locale|touchscreen|keyboard|keyboardHidden|navigation|orientation|screenLayout|uiMode|screenSize|smallestScreenSize|fontScale”>
<intent-filter>
<action android:name=”android.intent.action.MAIN” />
<category android:name=”android.intent.category.LAUNCHER” />
<category android:name=”android.intent.category.LEANBACK_LAUNCHER” />
</intent-filter>
<meta-data android:name=”unityplayer.UnityActivity” android:value=”true” />
<meta-data android:name=”unityplayer.ForwardNativeEventsToDalvik” android:value=”false” />
</activity>
</application>
<uses-sdk android:minSdkVersion=”18″ android:targetSdkVersion=”21″ />
<uses-feature android:glEsVersion=”0x00020000″ />
<uses-feature android:name=”android.hardware.touchscreen” android:required=”false” />
<uses-feature android:name=”android.hardware.touchscreen.multitouch” android:required=”false” />
<uses-feature android:name=”android.hardware.touchscreen.multitouch.distinct” android:required=”false” />
<uses-permission android:name=”android.permission.WAKE_LOCK” />
</manifest>

I’m using github for a large project with multiple developers – there have been a few wrinkles using the github mac client so we switched to SourceTree – a free github client. We’re using it to implement gitflow – I’ve been very happy with it so far – below is our process…
<>
Before you start a new feature
