Using Amazon SQS directly from Amazon API Gateway

big_queue_3

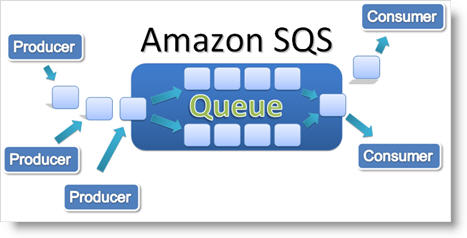
A project I’m working on right now uses Amazon’s SQS service to handle interprocess communication between elements of a large and complex back end architecture.  SQS is a fully managed message queuing service that enables you to decouple and scale microservices, distributed systems, and serverless applications. Using SQS, you can send, store, and receive messages between software components at any volume, without losing messages or requiring other services to be available.

One of our uses cases requires a SQS message to be triggered and created by an external call to our API. The most common way of handling this is to use a Lambda function to respond to an API request and then the Lambda function will create the appropriate SQS message and add it to the queue. What if we could skip Lambda all together? Amazon API Gateway can now be used to directly created SQS messages.

High level steps I followed

  1. Created an Amazon SQS queue.
  2. Created an Amazon IAM policy and role (to access the SQS queue).
  3. Published an API on API Gateway.
  4. Send and receive messages (single and batch) through the API Gateway.

<>

Details on #3 (Published an API on API Gateway)

  • created a new api at https://us-west-2.console.aws.amazon.com/apigateway/
  • created resources /v1/send/
  • created GET method /v1/send/GET
  • added URL query string ‘MessageBody’ to method execution for GET
  • added Integration request that points to appropriate SQS ARN
    • Integration type: AWS Service
      AWS Region: us-west-2
      AWS Service: Simple Queue Service (SQS)
      AWS Subdomain: NULL
      HTTP method: GET
      Path override: 453862545997/ninegeartest (SQS ARN)
      Execution role: arn:aws:iam::453862545997:role/apigateway-sqs-ninthgear-access-role
      Credentials cache: Do not add caller credentials to cache key
      Content Handling: Passthrough
      Use Default Timeout

      URL Query String Parameters:

      Action ‘SendMessage’
      MessageBody method.request.querystring.MessageBody

      MessageBody=TestMessageHello

  •  

    Used API Gateway Test function to call /v1/send/GET with MessageBody and then confirmed it appeared correctly in the previously created queue

    Response is

    {
    “SendMessageResponse”: {
    “ResponseMetadata”: {
    “RequestId”: “dfc617e1-b3c9-56a8-b9bf-426457676e2d”
    },
    “SendMessageResult”: {
    “MD5OfMessageAttributes”: null,
    “MD5OfMessageBody”: “0ef0d7773a388095bee26966144cc131”,
    “MessageId”: “3eb7ed29-c259-4b15-8bd3-bedeac865ee5”,
    “SequenceNumber”: null
    }
    }
    }

    Logs

    Execution log for request 01e665e2-9394-11e9-80e3-7b3c608a2b3c
    Thu Jun 20 19:45:50 UTC 2019 : Starting execution for request: 01e665e2-9394-11e9-80e3-7b3c608a2b3c
    Thu Jun 20 19:45:50 UTC 2019 : HTTP Method: GET, Resource Path: /v1/send
    Thu Jun 20 19:45:50 UTC 2019 : Method request path: {}
    Thu Jun 20 19:45:50 UTC 2019 : Method request query string: {MessageBody=TestMessageHello}
    Thu Jun 20 19:45:50 UTC 2019 : Method request headers: {}
    Thu Jun 20 19:45:50 UTC 2019 : Method request body before transformations:
    Thu Jun 20 19:45:50 UTC 2019 : Endpoint request URI: https://sqs.us-west-2.amazonaws.com/453862545997/ninegeartest?Action=SendMessage&MessageBody=TestMessageHello
    Thu Jun 20 19:45:50 UTC 2019 : Endpoint request headers: {Authorization=*************************************************************************************************************************************************************************************************************************************************01fa36, X-Amz-Date=20190620T194550Z, x-amzn-apigateway-api-id=mf9zjl6bxj, Accept=application/json, User-Agent=AmazonAPIGateway_mf9zjl6bxj, X-Amz-Security-Token=AgoGb3JpZ2luEK///////////wEaCXVzLXdlc3QtMiKAAkhESmjWUuH4MmwXcX3mJZu1ZFF29by1qO8Y/mUjx1llmQ6VlpkceQ2wnYfz8Gr4loy/CxqjjQeKa4Zpz83c1c5aEV7LrX4XlBIFxH5c+0O/BHA4Y6JbcSCSzc2z/Y6AUpvBnrfdE+S7TAqQw0aXzDTVfoFiysOFhatFmGfDa3TmXbNje6yqsj2QJKcTpI2D8KlN1IqUcuIMyYW06j8iZlcDcDuaB9BNtw3cNimdZpvUknaOr6HZ9kaSmhhIGnyRYxTN7bEnsqEGQY00p1Xsr8Q8JTrAaiHYSZA+964bBPWbladcrBPPvYGw111yV8teyabwJ6BczFmPHONyKNBSEbwqigMIlf//////////ARAAGgw0NTM4NjI1NDU5OTciDJAFb/8TLGKSTv3VkireAptIn3MrBh0o+01/ckMLSEM8kpHeFlnXhWeqfbQ11PIEH36/I7ahYyZE0Z7eS8fGbZ4DQmXDjB5D2Z6Y8Wo8b1gfnxZ7MwGdYhDlo/x4KeE7R92XbhPX+tAEsL61TMx6Pls7c9 [TRUNCATED]
    Thu Jun 20 19:45:50 UTC 2019 : Endpoint request body after transformations:
    Thu Jun 20 19:45:50 UTC 2019 : Sending request to https://sqs.us-west-2.amazonaws.com/453862545997/ninegeartest?Action=SendMessage&MessageBody=TestMessageHello
    Thu Jun 20 19:45:50 UTC 2019 : Received response. Status: 200, Integration latency: 18 ms
    Thu Jun 20 19:45:50 UTC 2019 : Endpoint response headers: {x-amzn-RequestId=dfc617e1-b3c9-56a8-b9bf-426457676e2d, Date=Thu, 20 Jun 2019 19:45:50 GMT, Content-Type=application/json, Content-Length=276}
    Thu Jun 20 19:45:50 UTC 2019 : Endpoint response body before transformations: {“SendMessageResponse”:{“ResponseMetadata”:{“RequestId”:”dfc617e1-b3c9-56a8-b9bf-426457676e2d”},”SendMessageResult”:{“MD5OfMessageAttributes”:null,”MD5OfMessageBody”:”0ef0d7773a388095bee26966144cc131″,”MessageId”:”3eb7ed29-c259-4b15-8bd3-bedeac865ee5″,”SequenceNumber”:null}}}
    Thu Jun 20 19:45:50 UTC 2019 : Method response body after transformations: {“SendMessageResponse”:{“ResponseMetadata”:{“RequestId”:”dfc617e1-b3c9-56a8-b9bf-426457676e2d”},”SendMessageResult”:{“MD5OfMessageAttributes”:null,”MD5OfMessageBody”:”0ef0d7773a388095bee26966144cc131″,”MessageId”:”3eb7ed29-c259-4b15-8bd3-bedeac865ee5″,”SequenceNumber”:null}}}
    Thu Jun 20 19:45:50 UTC 2019 : Method response headers: {X-Amzn-Trace-Id=Root=1-5d0be26e-b7b766dba15eb99009933350, Content-Type=application/json}
    Thu Jun 20 19:45:50 UTC 2019 : Successfully completed execution
    Thu Jun 20 19:45:50 UTC 2019 : Method completed with status: 200

    <>

    More details and an example I followed at https://dzone.com/articles/creating-aws-service-proxy-for-amazon-sqs


Augmented Reality on iOS

Durovis Dive

I’ve been working on an AR (augmented reality) application for iOS and thought I would share some of the available software libraries and devices for iOS.

Hardware

Although an iPhone is not as ‘hands free’ as a dedicated AR device (Moverio, Vuzix, or the Meta SpaceGlasses) there are interesting hardware solutions to use your iPhone or Android smart phone as a AR client…

Durovis Dive

Durovis Dive

The Durovis Dive works with any Android or iOS smartphone featuring a gyroscope and an accelerometer and a display not larger than 5 inches. You just insert your smartphone, start the application and adjust the lenses to your eyes.

FOV2GO

FOV2GO

You can construct your own FOV2GO Model D Viewer – for the iPhone 4/4S, the Samsung Galaxy Note, or most Android smart phones – out of foam board and a couple of plastic lenses. Just download the instructions and the appropriate template.

Software

Source for my initial research and a great resource at Augmented Reality SDK Comparison


Open Source and/or Free

Argon
iOs – augmented reality from Georgi Tech – appears to be open source but I can’t find the code available for download – based on KHARMA – a KML/HTML Augmented Reality Mobile Architecture

iPhone ARKit
iOS – iPhone ARKit is a small set of class that can give you augmented reality in any iPhone application.

iPhone Augmented Reality Toolkit
This version of the iPhone ARKit is a forked version of the ARKit started on GitHub by Zac White.

mixare – Open Source Augmented Reality Engine
iOS & Android – It works as a completely autonomous application and is available as well for the development of own implementations.

PRAugmentedReality
open source – Augmented Reality Framework for iOS

Vuforia
(from Qualcomm)
iOS, Android, and Unity 3D
Very powerful tracker based AR SDK – free for commercial development


Proprietary and/or Paid

ARPA
iOS & Android

ARToolKit
iOS & Android – a very powerful Lib with a lot of work being done with it – has an open source version (but not on mobile devices)

Catchoom
iOS & Android

Metaio
iOS & Android (includes Junaio) – lots of products, including content creation and a cloud offering

Robocortex

String
Comes in vanilla OpenGL and Unity flavours. Add AR to any iOS project, regardless of 3D engine.

Wikitude
iOS, Android and BlackBerry 10 – both tools for client and creation – also has an AR browser app – very popular with a lot of dev shops using it

Xloudia
cloud based AR recognition and tracking


Roll your Own

Augmented Reality iOS Tutorial: Location Based

Augmented Reality iOS Tutorial: Marker Tracking

Rich Text Format (RTF) documents from your web2py application

We needed to generate Microsoft Word .doc files from a web application based on web2py.  Creating a .doc file from scratch from python is no small task, but luckily for us rtf (Rich Text Format) files can be opened natively by Word and cover everything we needed.

Web2py includes the pyrtf library. Pyrtf is a set of python classes that make it possible to produce RTF documents from python programs. The library has no external dependencies and has proven reliable and fast.

The code snippet below is in a web2py function, it imports the library, initializes it and then creates a simple rtf doc.

After adding the line ‘Certified Staff Evaluation’ the function returns the newly created doc file. It is possible to create tables and include images – documentation for the library and example rtf generation files can be found at PyRTF. (note that web2py uses a slightly older version of pyrtf – you can see docs for it here.

from gluon.contrib.pyrtf import *

doc     = Document()
ss      = doc.StyleSheet
section = Section()
doc.Sections.append( section )

p = Paragraph( ss.ParagraphStyles.Heading1 )
p.append( 'Certified Staff Evaluation' )
section.append( p )
return doc

Web2PY , Google App Engine, and DatastoreTimeoutException

While web2py runs great on the Google App Engine there are several gotchas that can cause a lot of headache if you aren’t aware of them. [Note to readers – this post assumes an advanced understanding of web2py and python.]

Google App Engine will throw a timeout error (DatastoreTimeoutException ) if your web2py function takes too long to execute. This can happen with a long database update or query. The average time to trigger a timeout appears to be about 30 seconds.

One approach to resolve this, if you can’t refactor your query or update operation to guarantee it will stay under 30 seconds or 1,000 records, is to create a progress display page that periodically calls a web2py function to incrementally perform the operation you are attempting.

The example I’ll use is a fairly complex report that works against a large number of records that can take several minutes to execute.

We have a summary_report view that allows the user to choose multiple filter options (year, school, etc). On submit the controller summary_reports is called, the request.vars from the user selections are saved as session variables and the view summary_report_display is called. The variable session.summary_m is our chunk size for our query, you can increase it to speed up the report but going too high can cause the process to hit the 30 second limit.


@auth.requires_login()
def summary_reports():

    if request.vars.teacher_select:

        #stores running values from report generator
        session.dictGraphVariables={}

        #user selections
        session.year_select=request.vars.year_select
        session.school_select=request.vars.school_select
        session.class_select=request.vars.class_select
        session.teacher_select=request.vars.teacher_select
        session.semester_select=request.vars.semester_select
        session.observer_select=request.vars.observer_select
        session.datestart=request.vars.datestart
        session.dateend=request.vars.dateend

        session.includearchive=request.vars.includearchive

        #used in the partial query
        session.summary_i=0
        session.summary_m=300
        session.summary_break=0

        #counter for number of report results
        session.summary_overallcount=0

        redirect(URL('summary_report_display'))

    return dict()

Our summary_report_display view has a javascript function defined that calls our web2py function get_progress_on_summary_report every 3 seconds, the get_progress_on_summary_report does the heavy lifting.


{{extend 'layout.html'}}</pre>
<h1>Generating Reports</h1>
<h2>This may take a while if you have a lot of walkthroughs - but you can monitor progress below...</h2>
<pre></pre>
<div id="progress"></div>
<div id="summary_report_show"></div>
<pre>

Here is the code in the web2py controller for summary_report_display that sets up the progress bar display and the javascript call to get_progress_on_summary_report every 3 seconds.

progress = DIV(_id="progress")
wrapper = DIV(progress,_style="width:400px;")
summary_report_show = DIV(_id="summary_report_show")

@auth.requires_login()
def summary_report_display():

    page.include("http://ajax.googleapis.com/ajax/libs/jqueryui/1.7.2/jquery-ui.min.js")
    page.include("http://ajax.googleapis.com/ajax/libs/jqueryui/1.7.2/themes/ui-darkness/jquery-ui.css")
    callback = js.call_function(get_progress_on_summary_report)
    page.ready(jq(progress).progressbar( dict(value=request.now.second) )() )
    page.ready(js.timer(callback,3000))
    return dict(wrapper=wrapper)

The get_progress_on_summary_report function in the web2py controller does most of the work.


def get_progress_on_summary_report():

    if session.summary_break==0:

        queries=[]

        #base query includes all walkthroughs
        queries.append(db.t_walkthrough.id>0)

        #build the query list based on user selections

        #if user hasn't selected 'All' for an individual search/filter term, then add to the query
        if session.school_select!='All':
            queries.append(db.t_walkthrough.school==int(session.school_select))

        if session.semester_select!='All':
            queries.append(db.t_walkthrough.semester==session.semester_select)

        if session.year_select!='All':
            queries.append(db.t_walkthrough.f_year==session.year_select)

        if session.class_select!='All':
            queries.append(db.t_walkthrough.t_class==int(session.class_select))

        if session.teacher_select!='All':
            queries.append(db.t_walkthrough.teacher==int(session.teacher_select))

        if session.observer_select!='All':
            queries.append(db.t_walkthrough.observer==int(session.observer_select))

        #handle start / end date if user entered same
        if len(session.datestart)>0:
            date_object = datetime.datetime.strptime(str(session.datestart), '%Y-%m-%d')
            queries.append(db.t_walkthrough.f_date>=date_object)

        if len(session.dateend)>0:
            date_objectEnd = datetime.datetime.strptime(str(session.dateend), '%Y-%m-%d')
            queries.append(db.t_walkthrough.f_date
        #create query from list
        summary_report_query = reduce(lambda a,b:(a&b),queries)

        rows = db(summary_report_query).select(limitby=(session.summary_i*session.summary_m,(session.summary_i+1)*session.summary_m))

        for r in rows:

            # do something with r
            session.summary_overallcount+=1
            list_walkthrough_result=db(db.t_walkthrough_result.walkthrough==r.id).select()
            for w_record_result in list_walkthrough_result:
                if not type(w_record_result.f_result) is NoneType:
                    if w_record_result.f_result==None:
                        #do nothing
                        testvalue='none'
                    else:
                        if w_record_result.f_result in session.dictGraphVariables:
                            session.dictGraphVariables[w_record_result.f_result]+=1.0
                        else:
                            session.dictGraphVariables[w_record_result.f_result]=1.0

        if len(rows)
<a href="summary_reports_complete">Click Here to View Graphs</a>'
            else:
                return_value='Report generation complete - there are ' + str(session.summary_overallcount) + ' results.

'

            return jq(summary_report_show).html(return_value)()
        else:
            return

The core of the the iterative process is the query below, it pulls a chunk of rows (size defined by summary_m) each cycle.

rows = db(summary_report_query).select(limitby=(session.summary_i*session.summary_m,(session.summary_i+1)*session.summary_m))

This performs our operation in chunks, once there are no more rows the function changes state and then returns a link to the summary_report_show view page which will parse the results and present them to the user, if no results are produced then the operation tells the user.

This approach will let you perform queries or db updates against an very large set of records without triggering the timeout.

Using Parse to add a backend to your iOS app

We’ve had to write over a dozen server back ends for iOS applications. There is a lot of manual work involved, no matter what platform you choose (we’ve used Google App engine or custom php solutions based on Joomla). There is the code and database development on the server side, plus a lot of code on the iOS side to handle the calls to the server, error handling, etc. It’s a royal pain and something we’d like to avoid in the future if possible.

Parse is a new service that simplifies back end development for iOS immensely – it can take literally minutes to add a simple server side component to your iOS app.

Pricing is free in Beta and looks very reasonable going forward as well.

We recently used Parse to add server functionality to an iOS Math application for YourTeacher.com. The app stores user preferences to a simple Parse object. Adding Parse to our project, testing, and deploying took less than an hour. Performance is good – besides being able to save and retrieve standard dictionary objects you can use Parse to store and manipulate remote files and geo location objects.

They have a very good overview of the integration process for iOS, plus the API is available as a REST service and for the Android as well.

Highly Recommended

PDFS from GAE using web2py & pdfcrowd

Recently we used pdfcrowd to print pdfs from several of our applications running on the Google App Engine.

Integration is very straight forward – we use the web2py python framework to run on top of GAE – so these steps reflect that. Also in our example we want our python function to return the content as a pdf file.

  1. Register at pdfcrowd
  2. Download their python client library
  3. Copy the source of the client library to the module directory of your web2py application directory
  4. Use the code snippet example below to initialize and call the pdfcrowd library
def print_observation_formpdfcrowd():

   out = StringIO.StringIO()

   pdfcrowd = local_import('pdfcrowd')

   client = pdfcrowd.Client("username", "apikey")

   # our html to convert
   html='<head></head><body>My HTML Layout</body>'

   client.convertHtml(html, out)

   # prepare PDF to download:
   response.headers['Content-Type']='application/pdf'

   pdf_file_name = 'evaluation.pdf'

   response.headers['content-disposition']='attachment;
      filename='+pdf_file_name

   return out.getvalue()